How to Install and Configure a USB Wi-Fi Adapter on Raspberry Pi 5 as an Access Point
Aug. 8, 2024, 8:34 a.m.
Recently, for a project, I needed to install a USB Wi-Fi adapter on my Raspberry Pi 5. The experience was quite challenging as finding a clear and comprehensive guide was nearly impossible. After some effort and piecing together information from various sources, I managed to set up a new network that functions as an access point, allowing me to connect my ESP32 to the Raspberry Pi 5.
In this blog, I aim to simplify this process for anyone with a similar need, providing a step-by-step solution from start to finish.
Hardware and Software Details
For this setup, I used a Tenda U2 V5.0 WiFi 6 USB AX300 adapter, which provides a transmission speed of up to 286Mbps on the 2.4G band and features a 6dBi gain antenna. My Raspberry Pi 5 runs Ubuntu 24.04 as the operating system.
The first step is to install the necessary drivers for the adapter.
Installing the Driver
- Download the Driver: Download the driver from the manufacturer’s website: Tenda U2 V5.0 Driver.
- Install Kernel Headers: Before installing the driver, ensure that the kernel headers are installed.
sudo apt update
sudo apt install linux-headers-$(uname -r)
3. Create a Symbolic Link to the Headers:
sudo ln -s /usr/src/linux-headers-$(uname -r) /lib/modules/$(uname -r)/build
4. Install the Driver: unzip the downloaded folder, go into the folder and install the driver using the precompiled .deb file.
sudo dpkg -i AX300-WiFi-Adapter-Linux-Driver-arm.deb
After installing the driver, you should be able to see the wireless device name among the network devices.
Preparing for Access Point Configuration
Before configuring the access point, install the necessary tools:
sudo apt update
sudo apt install wireless-tools hostapd dnsmasq
Identifying the Network Interface
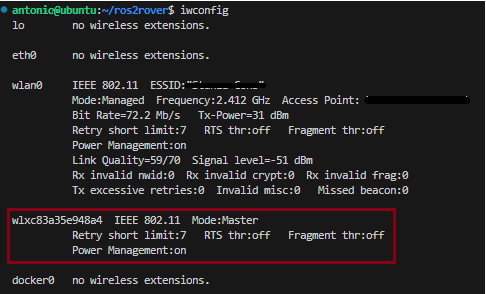
Use the following command to identify the new network interface:
iwconfig
This is the output in my case, in the red box the new interfaces.

Configuring the Access Point
- Assign a Static IP Address:
sudo nano /etc/dhcpcd.conf
Add the following text:
interface wlxc83a35e948a4 #your name interface from the iwconfig output
static ip_address=192.168.4.1/24
nohook wpa_supplicant
2. Configure DHCP for the Interface: dnsmasq is a lightweight, easy-to-configure DNS forwarder and DHCP server. It is ideal for small-scale network configurations like in my case.
sudo nano /etc/dnsmasq.conf
Add the following text:
interface=wlxc83a35e948a4 #your name interface from the iwconfig output
port=5300
dhcp-range=192.168.4.2,192.168.4.20,255.255.255.0,24h
interface=wlxc83a35e948a4: Specifies the interface thatdnsmasqwill provide DHCP services on.port=5300: Changes the default port to avoid conflicts with systemd-resolve that use the 53 port.dhcp-range=192.168.4.2,192.168.4.20,255.255.255.0,24h: Defines the range of IP addresses thatdnsmasqwill assign to clients, along with the subnet mask and lease time.
3. Configure Hostapd: hostapd (Host Access Point Daemon) is a user-space daemon that allows you to configure and manage the wireless access point.
sudo nano /etc/hostapd/hostapd.conf
Add the following text:
interface=wlxc83a35e948a4
ssid=ACCESS-POINT-NAME
hw_mode=g
channel=4
wmm_enabled=0
macaddr_acl=0
auth_algs=1
ignore_broadcast_ssid=0
wpa=2
wpa_passphrase=YOUR-PASSWORD-HERE
wpa_key_mgmt=WPA-PSK
wpa_pairwise=TKIP
rsn_pairwise=CCMP
interface=wlxc83a35e948a4: Specifies the wireless network interface to use.ssid=ACCESS-POINT-NAME: Sets the name of the wireless network (SSID).hw_mode=g: Sets the hardware mode to 802.11g.channel=4: Sets the wireless channel.wpa=2: Enables WPA2 security.wpa_passphrase=YOUR-PASSWORD-HERE: Sets the passphrase for the network.wpa_key_mgmt=WPA-PSK: Uses WPA-PSK key management.wpa_pairwise=TKIPandrsn_pairwise=CCMP: Specifies the encryption types.
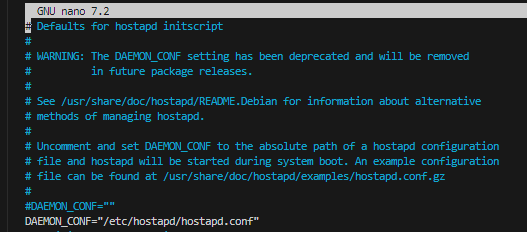
4. Link Hostapd Configuration:
sudo nano /etc/default/hostapd
Add the following line:
DAEMON_CONF="/etc/hostapd/hostapd.conf"

5. Create a Symbolic Link for DNSMasq:
sudo ln -s /etc/resolv.conf /run/dnsmasq/resolv.conf
Starting and Enabling Services
We can now start and enable the previous services created:
1. Unmask, Start, and Enable Hostapd:
sudo systemctl unmask hostapd
sudo systemctl start hostapd
sudo systemctl enable hostapd
2. Start and Enable DNSMasq:
sudo systemctl start dnsmasq
sudo systemctl enable dnsmasq
Configuring Network with Netplan
Netplan is a utility that provides a simple and unified way to configure networking on Linux systems that use systemd. It allows you to define your network configurations using YAML files, which are then translated into configurations for either NetworkManager or systemd-networkd, depending on your system’s setup.
When setting up your Raspberry Pi as an access point, you need precise control over the network interfaces to ensure they work correctly. Configuring Netplan allows you to:
- Set a Static IP Address: For the interface that will serve as the access point, you need to assign a static IP address. This is crucial because an access point needs to have a fixed address to serve clients consistently.
- Define Nameservers: You specify DNS servers (e.g., Google’s DNS servers 8.8.8.8 and 8.8.4.4) that the Raspberry Pi will use to resolve domain names.
- Control Over Interface Behavior: Netplan gives you the ability to define the behavior of the network interfaces at a lower level, ensuring that they work harmoniously with other services like
hostapdanddnsmasq.
Create a Netplan configuration file:
sudo nano /etc/netplan/<your configuration file name>.yaml
Add the following configuration (replace wlxc83a35e948a4 with your interface name):
network:
  version: 2
  ethernets:
    wlxc83a35e948a4:
      addresses:
        - 192.168.4.1/24 #the static ip you want to assign to the access point
      nameservers:
        addresses:
          - 8.8.8.8
          - 8.8.4.4
Apply the new Netplan configuration:
sudo netplan apply
Conclusion
After all these step, you can reboot your system.
sudo reboot
With these steps completed, your Raspberry Pi 5 should now be set up as an access point, allowing other devices to connect to it wirelessly. This setup can be particularly useful for projects that require a dedicated local network, such as connecting IoT devices like the ESP32.